Showing posts with label art. Show all posts

Tulip Nail Art ft. PRITI NYC


So here we are, only a month left until Spring officially starts - and already I'm excited for winter to be over… if only all the Canadian snow would melt. Today we have a manicure for you which features a brand which is new to us, Priti NYC. This brand is non-toxic and 4 free, or free of 4 known carcinogens including  toluene, dibutyl phthalate (DBP), formaldehyde, and camphor. Many brands are marketing themselves as 3 free recently - for more on what this means see All Laquered Up's great resource on this topic!

Priti NYC was started in 2005 by founder Kim D'Amato with the goal of reducing harmful chemicals and supporting organic farmers - and we have to say that it is a success! For all the eco-friendly non-believers out there, these polishes will change your mind, no question about it. Crown of Thorns (a gorgeous baby blue) delivers in terms of colour payout and opacity. We cannot get enough of this colour and have been rocking it solo with an accent nail. For all the pastel lovers rejoicing at Spring's new collections - this colour is for you!

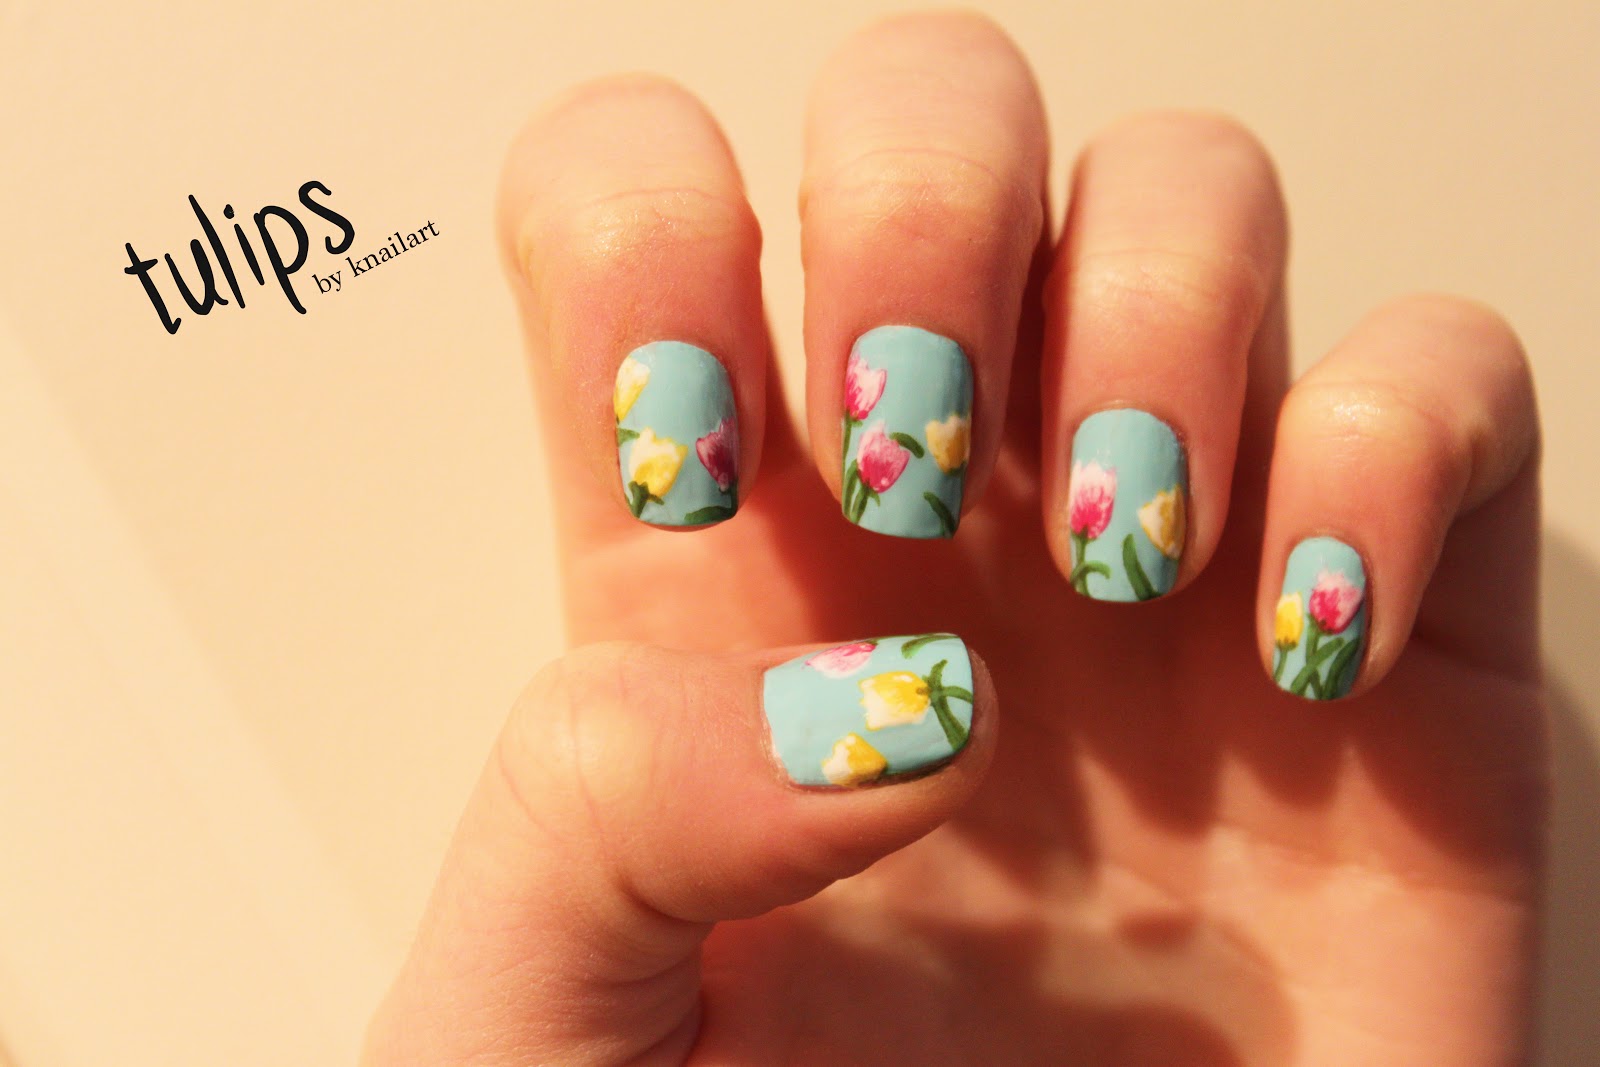
To help usher in the Springtime, we used a few (but really, 8) of Priti NYC's shades to create a full finger tulip mani, putting accent nail florals to shame! This mani was created using Crown of Thorns as a base. We started by using the darker pink and yellow (Nice Gal Peony and Lampshade Poppy, respectively) to draw a U shape with a thin brush wherever we wanted the flowers to be. We tried to make each nail different - that's part of the fun! Then we used the lighter pink and yellow (Ballerina Peony and Horned Poppy) to fill the U half full with the same nail art brush. While waiting for the tulips to dry before adding white, we used a clean nail art brush to draw stems in Baby Tears from the base of each tulip to the free edge of our nail. We added some leaves for fun, and then used the lighter green shade, Love Patt, on top, to give a more dimensional look to the leaves. To finish this mani, we used White Ballet Dahlia on the tips of both the tulips (using a clean nail art brush). Then we used our favourite Seche Vite topcoat, and allowed to dry. Check out the picture below, and let us know what you think!


Overall, the Priti NYC polishes were easy to apply and had a better smell than most other nail polishes - which we love! We definitely recommend checking out Priti NYC, you can find them on Facebook, Twitter, and Pinterest!

Disclaimer: These products were provided to us by the company/PR for our honest consideration and review.

Red Rose Nails ft. Butter London


If you didn't know, Valentine's day is coming up. Shocked? Us too. We've been the culprit of the done to death heart nail art many times, but this time we decided to go for a fresh take on Valentine's day nails - red roses! Thanks to Butter London's 25% off Reds Sale, we picked up some classic reds including Blowing Raspberries, Knees Up, Pillar Box Red, and the classic Union Jack Black.

Close up of the middle and ring finger
We have been feeling like a full hand nail art was in store - go big or go home, right? - and so we painted each nail to look like a bouquet of red roses. We started (post base-coat) with Knees Up, which is a gorgeous metallic red which catches the light behind the roses. We then used a nail art brush to make swirl patterns (making up a circle) of Blowing Raspberries and Pillar Box Red covering most of the nail in circles, or 'roses-in-progress', to create depth. We then used a steady hand and a super-thin nail art brush to paint the shadows of the roses in Union Jack Black. Finish with topcoat, and voila - a wilt-proof red rose bouquet!

Full Red Rose Nails
If you're feeling like the full hand is too much for you, we also love this look on the accent nail, with a full hand of Blowing Raspberries (which may just be our new go-to berry shade) to contrast the metallic. What mani will you be rocking on Valentine's day?

NOTD: Ombre Love Manicure


Valentine's Day Nail Art

 With Valentine's Day right around the corner, we think it's the right time to get in the spirit and embrace the heart-filled nail art craze. To keep this mani fun and fresh, we used an OPI Liquid Sand Shade on the thumb and ring finger, and used a bold red with black and white accents on the remaining fingers. We love the results, and the added texture from OPI Liquid Sand makes this mani even more interesting to look at! If you can't get your hands on OPIs Liquid Sand collection, we recommend a glitter accent nail in a coordinating shade.

What you need:

  • Red nail polish (we used Nails Inc. St. James, available here)
  • White nail polish (we used China Glaze White on White, available here)
  • Red Liquid Sand nail polish/Glitter nail polish (we used OPI Liquid Sand The Impossible, available here)
  • Black nail polish (we used Essie Licorice, available here)
  • Nail art brush (available, as a set including a dotter, here)
  • Base coat and top coat (we used Essie First Base, available here, and Seche Vite top coat, available here)
What to do:
  1. Paint all nails with a base coat.
  2. Paint your accent nails (thumb and ring finger) with the red liquid sand (or glitter) polish, and all other fingers with a red polish. Do 2-3 coats as required.
  3. Pinky: Use black polish on half of the nail, and paint the top half of 'LOVE' using a nail art brush. After that dries, use the (clean) nail art brush and white polish to connect the bottom half of 'LOVE'.
  4. Middle Finger: Using the nail art brush and black polish, starting at the centre of the nail, make two dots and then drag the dots together, making a small heart. Repeat this until the nail is covered. Then, using a clean nail art brush, put white polish inside one of the hearts as an accent heart.
  5. Pointer Finger: Using white nail polish and a nail art brush, draw many xo's all over the nail, and then draw a larger white heart in the centre of the nail (following the procedure in step 4). Then, using a clean nail art brush, fill in the white heart with black  polish.
  6. Allow all to dry, and paint with a top coat! Note: for OPI Liquid Sand, do not topcoat, as the matte 'sand' effect will be lost.


Completed Valentine's Day Nails

Monarch Butterfly Wing Nails

Monarch Butterfly Wing Nails


The Monarch Wing Nails on a full hand.


Why we love these:

These nails reflect the beauty of mother nature, and are fun and easy to do! We love mixing this look up with different backgrounds colours (full silver glitter butterfly, anyone?) and even using it as an accent nail to liven a tired mani!

What you need:

  • White Polish (we used OPI Alpine Snow, buy it here)
  • Black Polish (we used Essie Licorice, buy it here)
  • Orange Polish (we used Misa Speed of Life, buy it here)
  • Gold Shimmer Polish (we used Chanel Gold Fiction, buy it here)
  • Base Coat and Top Coat (we used Essie, buy the top coat here, and base coat here)
  • Nail Art Brush and Dotter Tool (buy both in a set here here)
  • Makeup Sponge (we used something similar to the Make Up For Ever HD Sponge, buy it here)

What to do:

  1. Start with clean, dry nails. Paint each nail with base coat.
  2. Paint each nail with two coats of your gold shimmer polish, and allow to dry fully (this is the most important part!).
  3. Soak your makeup sponge in water - so it doesn't absorb all of the polish - and paint your orange polish on to one side. Begin sponging at the tip of your nail, and move  3/4 of the way towards one upper corner, creating an ombre style fade of orange polish in to the gold shimmer polish.
  4. Using your nail art brush and black polish, paint a diagonal black line from the upper top corner to the opposite bottom corner of your nail. Perpendicular to this black line, draw another black line near the top of your nail.
  5. Use the nail art brush to draw two more black lines, dividing the bottom section of your nail in to 4 quarters. Fill in the tip of your nail creating rounded edges (see photo below for clarification).
  6. Using the dotter tool and white polish, make some white spots on the black tip of your nail.
  7.  After ensuring your nails are dry enough to top coat without running (allow about 5-10 minutes), paint the top coat over your whole nail and the tip of your nail and allow to dry!

Close up of a Monarch Wing nail.

Flower Pattern Nails

Flower Patterned Nails


Why we love these:

These nails are super simple, and classic! They don't require a high skill level or any specific tools, and the colours can be varied endlessly. For a simple, chic design that is easy to paint and wear - this is the answer!

What you need:

  • Black Polish (we used Essie Licorice, buy it here)
  • White Polish (we used OPI Alpine Snow, buy it here)
  • Yellow Polish (we used Misa Hanging With the Girls, buy it here)
  • Silver Glitter Polish (we used China Glaze Glistening Snow, buy it here)
  • Base Coat and Top Coat (we used Essie, buy the top coat here, and base coat here)

What to do:

  1. Start with clean, dry nails. Paint each nail with a base coat.
  2. Paint two coats of a high shine black polish (navy blue works well too!) on each nail.
  3. Using the brush attached to your white nail polish lid (no separate brush required, although it may be helpful for smaller flowers) make 5 dots in a circle, and drag inward to the centre of your circle. Repeat these circles on each as many times as you can fit - we averaged about 3 flowers a nail. For a less uniform look, vary sizes of each circle. 
  4. On top of the white areas, use a sliver/white glitter. This step can be omitted for a more plain floral pattern.
  5. Using yellow polish, make a small dot in the center of your white 'petals', completing your flowers.
  6.  After ensuring your nails are dry, paint a layer of top coat (dont miss your tips!) and allow your nails to fully dry!


Striped Pink Ombre Nails

Striped Pink Ombre Nails

Completed Striped Ombre Nails.

Why we love them:

What girl doesn't love pink? Scratch that, what girl doesn't love every shade of her favourite colour? These nails can be reproduced with any colour, as well as with vertical or diagonal stripes, instead of horizontal. With so many different options, these nails are completely customizable... and we love being unique! These beauties look good with a little black dress and heels in the same shade!


What you need:

  • 5+ shades of any one colour, organized by shade
  • Scotch Tape
  • Nail Art Brush (buy it in a set here)
  • Base Coat and Top Coat (we used Essie, buy the top coat here, and base coat here)


What to do:

  1. Start with clean, dry nails. Paint each nail with base coat.
  2. Place the tape very close to the base of the nail but leave room for one colour. Paint with the darkest shade.
  3. Repeating that step slowly moving the tape farther down the nail and changing the colour for each stripe. Try to keep the space between your last colour and the tape constant, for a cleaner look!
  4. Once the whole nail is completed, fix up any mistakes with a nail art brush.
  5. Paint on top coat after ensuring your nails are dry, and allow to dry!

Close-up striped pink ombre nails.

Black on Black Cheetah Nails

Black on Black Cheetah Nails

The completed Black on Black Nails.

Why we love them:

You may or may not be able to see the cheetah pattern in the picture but we love the textured look and having shiny detail that is the same colour as the matte background. This is a fun and cool twist if you usually wear black nails or if you just want to try a subtle cheetah pattern on your nails.


What you need:

  • Dotter Pen (buy it in a set here)
  • Black (we used Essie Licorice, buy it here)
  • Base Coat (we used Essie, base coat here)
  • Matte Top Coat (we used Nails Inc.Westminster Bridge, top coat here)


What to do:

  1. Start with clean, dry nails. Paint each nail with base coat.
  2. Paint all nails black. Two coats may be required.
  3. Apply the matte top coat to all nails.
  4. Once the nails are somewhat dry, using the dotter pen shape and create your cheetah pattern. 
  5. Top coat is not to be used with this nail art design otherwise the matte black background or the cheetah would be ruined whether you would use a matte or normal top coat, so just let dry!

Another completed look of the Black on Black Nails.

Strawberry Nails

Strawberry Nails

The completed Strawberry Nails.

Why we love them:

We love art inspired by nature - and also, we love strawberries! These nails are summertime fresh and look good enough to eat. These nails also look good in reverse (with the green near your cuticles! Try them out and let us know how they turn out!

What you need:

  • Nail Art Brush and Dotter Pen (buy it in a set here)
  • White (we used OPI Alpine Snow, buy it here)
  • Black (we used Essie Licorice, buy it here)
  • Red (we used Nails Inc. The Hurlingham, buy it here)
  • Green (we used China Glaze Starboard, view it here)
  • Base Coat and Top Coat (we used Essie, buy the top coat here, and base coat here)


What to do:

  1. Start with clean, dry nails. Paint each nail with base coat.
  2. Paint all nails with your red colour. Two coats may be required.
  3. With the Nail Art brush, paint green zig zag edge on the tips of your nail. Use triangles of different sizes in order to look more like the leaves on top of a strawberry.
  4. With the smaller end of your Dotter Pen, randomly dot small white dots in the leftover red space of your nails. Allow this to dry fully before starting the next step.
  5. With the smaller end of your Dotter Pen again, tilt your Dotter Pen so that you have a smaller dot surface (so some white will still show through) and dot on top of every white dot on your nails.
  6. Paint on top coat after ensuring your nails are dry so there is no runs in your polish, and allow to dry!

Close-up on Strawberry Nail.

Drip Nails

Drip Nails

The completed Drip Nails.


Why we love it:

These nails give the impression that you just dripped nail polish on to your tips, and let it run down your nails (without the mess!). We love the look of these nails in light and dark shades of the same colour, as well as with neon drips over a nude background - a trend we love for this summer. Black on white or grey also has a cool look to it! Try it out and send us a picture! 

What you need:

  • Nail Art Brush and Dotter Tool (buy it in a set here)
  • Dark Blue (we used Nails Inc. Baker Street, buy it here)
  • Light Blue (we used China Glaze Kinetic Candy, buy it here)
  • Medium Blue (we used OPI No Room for the Blues, buy it here)
  • Base Coat and Top Coat (we used Essie, buy the top coat here, and base coat here)

What to do:

  1. Start with clean, dry nails. Paint each nail with base coat.
  2. Paint all nails the lighter blue shade. Two coats may be required.
  3. Paint a dark blue tip on your nails - don't worry if it is messy at this point!
  4. With the Dotter tool, make 2-4 dots (depending on how big your nails are) at various heights between the middle of your nail, and the tip.
  5. With the Nail Art brush, use the darker blue paint to connect the darker tip to your dark blue dots. making what looks like drips down the tips of your nails.
  6. Paint on top coat after ensuring your nails are dry so there is no runs in the polish, and allow to dry!

Drip Nail close-up.

Burberry Nails

Burberry Nails

Full Burberry tape nails.
Why we love these nails:

These nails mirror the iconic pattern that is burberry. These nails look great as an accent nail or a full set, and are classy enough to wear everyday, or out at night! These are definitely a knailart favourite!


What you need:

  • Nail Art Brush (buy it in a set here)
  • White (we used M.A.C. Vestral White, no longer sold)
  • Black (we used Essie Licorice, buy it here)
  • Nude (we used Nails Inc. Basil Street, buy it here)
  • Maroon (we used Chanel 18 Rouge Noir, view it here)
  • Scotch Tape (available at craft stores or dollar stores)
  • Base Coat and Top Coat (we used Essie, buy the top coat here, and base coat here)


What to do:

  1. Start with clean, dry nails. Paint each nail with base coat.
  2. Paint all nails nude. Two coats may be required. Allow to dry.
  3. Paint nail polish onto long strips of tape.
  4. Cut the tape into the desired widths.
  5. Apply white strips, then black, and then red to all nails. Cut off the ends that stick out past the nail. Feel free to change where the whites meet to change up each nail a little bit!
  6. Touch anything up with your nail art brush (although the lines should be pretty straight).
  7. Paint on top coat after ensuring your nails are dry and the tape is completely stuck, and allow to dry!

The completed look.

The close-up Burberry Nail.

Rubber Ducky Nails

Rubber Ducky Nails

The completed Duck Nails.


What you need:
  • Nail Art Brush and Dotter Pen (buy it in a set here)
  • White (we used OPI Alpine Snow, buy it here)
  • Blue (we used China Glaze Kinetic Candy, view it here)
  • Yellow (we used Misa Nail Lacquer Hanging with the Girls, unavailable for purchase online)
  • Orange (we used Misa Nail Lacquer Speed of Life, unavailable for purchase online)
  • Black (we used Essie Licorice, buy it here)
  • Base Coat and Top Coat (we used Essie, buy the top coat here, and base coat here)


What to do:

  1. Start with clean, dry nails. Paint each nail with base coat (this will increase the shine of your 'bare' nail at the end!).
  2. Paint a blue tip on your nail, don't worry about being messy as the top will be covered with the bubbles.
  3. With the Dotter Pen, dot large white circles starting concentrated where the top of your blue tip meets your bare nail, and move to the edge of your nail, becoming less concentrated (more space between the bubbles) as you get closer to the edge of your nail.
  4. With the Dotter Pen again, use the edge of the dot dipped in light blue and make a lighter dot over each white bubble.
  5. With the Nail Art Brush, draw the outline of the duck on top of your bubbles (on any nail you wish!) in yellow.
  6. Paint the whole duck yellow.
  7. Paint the beak orange with the brush.
  8. Using the small end of the dotter paint one eye using black.
  9. Paint on top coat after ensuring your nails are dry, and allow to dry!

Missoni Nails


'Missoni' Zig-Zag Nails

The completed Missoni Nail
This nail art looks great as an accent nail or a full set. It would also look fabulous on big toes!


What you need:

  • Nail Art Brush (buy it in a set with a dotter from Sephora, here)
  • Nude (we used Nails Inc. Basil Street, buy it here)
  • Dark Pink (we used Essie Big Spender, buy it here)
  • Light Pink (we used Essie Off the Shoulder, buy it here)
  • Navy Blue (we used Essie Aruba Blue, buy it here)
  • Base Coat and Top Coat (we used Essie, buy the top coat here, and base coat here)


What to do:

  1. Start with clean, dry nails. Paint each nail with base coat.
  2. Choose a pattern of nail polish that looks the best to you. We used Nude, Navy Blue, Dark Pink, Light Pink.
  3. Start in the middle with your darkest colour. Put a dot in the middle of your finger so you can move outwards to the edges of your nail evenly. 
  4. Move in one direction first (we went to the cuticle first, then move from middle to tip) using each colour in the pattern you set out, cleaning the nail art brush with nail polish remover and a cotton pad between each colour.
  5. Paint on top coat after ensuring your nails are dry so there is no running, and allow to dry!

Tuxedo Nails

Tuxedo Nails

Finished Tuxedo Nail!

What you need:

  • Nail Art Brush and Dotter Pen (buy it in a set here)
  • White (we used M.A.C. Vestral White, no longer sold)
  • Black (we used Essie Licorice, buy it here)
  • Small diamond (available at Michael's)
  • Base Coat and Top Coat (we used Essie, buy the top coat here, and base coat here)


What to do:

  1. Start with clean, dry nails. Paint each nail with base coat.
  2. Paint all nails white. Two coats may be required.
  3. With the nail art brush, paint two black lines from the bottom corner of your nail to the middle on both side and then fill in with black polish once your lines are how you want them.
  4. With the nail art brush again, design your bow tie however big or small you want it.
  5. With the Dotter Pen, dot 2 black dots down the center of your nail.
  6. Once the bow tie is dry, put topcoat on the middle of the bow tie and place the diamond down to dry.
  7. Paint on top coat after ensuring your nails are dry and the diamond is stuck, and allow to dry!


Purple Fade Aztec Nails

Purple Fade Aztec Nails

Finished Purple Fade Aztec Nails

What you need:

  • Nail Art Brush (buy it in a set with a dotter tool here)
  • White (we used M.A.C. Vestral White, no longer sold)
  • Light Purple (we used Essie Lilacism, buy it here)
  • Medium Purple (we used OPI Do You Lilac It?, buy it here)
  • Dark Purple (we used Ardene's Violet, see it here)
  • Black (we used Essie Licorice, buy it here)
  • Base Coat and Top Coat (we used Essie, buy the top coat here, and base coat here)


What to do:

  1. Start with clean, dry nails. Paint each nail with base coat.
  2. Paint all nails white. Two coats may be required.
  3. Leaving about 1/2 a cm of space in the middle of your nail, paint the light purple from the middle to the edge of your nails, touching it up with the nail art brush.
  4. Once the light purple has dried leave a bit of light purple showing and paint on the medium purple to the edge of your nail.
  5. Once the medium purple has dried leave a bit of medium purple showing and paint on the darkest purple to the edge.
  6. There is no other way to explain the designs other than to look at the picture (or just be creative!), but once the purple fade has dried paint on the black using the nail art brush to ensure the lines are smooth and exact.
  7. Paint on top coat after ensuring your nails are dry so there is no running, and allow to dry!

Close-up Aztec designs


Half Moon Nails

Half Moon Nails


A close-up of the finished Half Moon Nails.

What you need:
  • Nude (we used Nails Inc. Basil Street, buy it here)
  • Coral (we used Nails Inc. Portobello, buy it here)
  • Hole Punch Reinforcements (available at Staples, or any school supply store)
  • Base Coat and Top Coat (we used Essie, buy the top coat here, and base coat here)


What to do:

  1. Start with clean, dry nails. Paint each nail with base coat.
  2. Paint all nails with the nude polish. Two coats may be required.
  3. Once the polish is completely dry (this may take 10-20 minutes), put the reinforcements on your nail so that the circle has half nail and half cuticle showing. Press the reinforcement gently on to your nail so no nail polish gets under and ruins the half moon!
  4. Paint the coral colour from the reinforcement to the tip of your nail. This also may require two coats.
  5. Allow the second colour to dry, and then slowly peel off the reinforcement from your nail. 
  6. Paint on top coat over both polishes after and allow to dry!


After Step 3, before painting the coral colour.


After Step 4, after painting the coral colour.