Swatched: OPI Euro Centrale Collection

We're excited to share with you swatches of the OPI Euro Centrale Collection! This collection has a mix of rich cremes, with a few metallics thrown in! We swatched 6 shades from this collection and are in love with the colour payoff! 

This is You're Such a Budapest, which is a periwinkle (although it photographed slightly more purple!) with a hint of shimmer. This is two coats without topcoat - one of our favourites!


This is our favourite shade from this collection - Eurso Euro. This royal blue has deep purple undertones and really packs a punch in terms of colour payoff. Two coats with no topcoat.


This is Can't Find My Czechbook, is a blue turquoise which continues the great colour payoff trend in this collect. Two coats without topcoat in the swatch below.


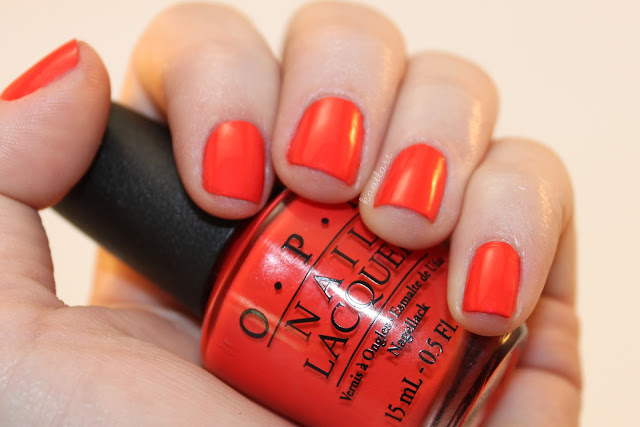
This shade is bright - almost blinding red-orange. You cannot miss My Paprika is Hotter Than Yours from a mile away. We loved how this looked and will definitely be adding this to our rotation! Two coats to opacity, no topcoat.


This shade turned out to be more of a jelly than the others when we applied thin enough layers - perhaps a jelly sandwich in our future? Suzi's Hungary Again is a cheery pink, we applied three layers with no topcoat for this swatch.


If we're one thing (other than nail polish addicts) it would be glitter addicts. This glitter is fab! Pink, turquoise and blue-purple small hex glitters mixed with fine glitters in the same colours make a great topper for any mani. We used two coats of Polka.com over Eurso Euro for this swatch.


Overall, we love how fun and bright this collection was. The collection includes a total of 12 polishes, which in addition to the ones above boast copper, rose, and gold metallic shades, as well as a milky creme (My Vampire is Buff) which we're currently on the hunt for. The collection also includes another, darker blue shade in I saw… U saw… We saw... Warsaw as well as a deep purple shade in Vant To Bite My Neck? We definitely recommend checking out the rich hues in this collection - and stay on the lookout for our nail art using some polishes from this collection in the coming days!

You can check out OPI online, or on Facebook, Twitter and Instagram!

Disclaimer: These products were provided to us by the company/PR for our honest consideration and review.

0 comments:

We take time to read each and every comment! Thanks so much :)

Striping Tape Mani ft. Sonia Kashuk Mini-Review


Simply put, we are addicted to this mani. The OCD in us loves the clean striping tape design, and our metallic love-fest continues in to Spring! While the grey colour almost appears brown in these photos, it was much darker off camera and true to the grey colour, even over the gold. If you don't have striping tape, you can try cutting painters tape or scotch tape (hey - we've done it!) in a pinch. The key is to leave the striping tape longer than the line you're painting, so that you can pull it off without having to dig in to your fresh polish.

We started this mani with two coats of Sonia Kashuk Golden Ticket, which we then allowed to dry fully. The swatch of this colour (our new favourite gold), to the left, is two coats with no topcoat. The shine this polish delivers without topcoat is incredible, however if you apply a second coat too quickly, some polish may drag creating a bumpy effect. Overall, we loved this colour simply for how opaque the coverage was, and that it was a true gold as opposed to the bronze "golds" we see everywhere.


We then used striping tape to make the pattern on our nails, laying tape wherever we wanted gold to remain. You can do this in 2 parts, either by going in one direction (and trying to stay in the lines) first, before laying the lines in the other direction, or you can line up the edges of your tape. The second way is more difficult and more time consuming - we recommend going one at a time. We used two coats of Sonia Kashuk Dime a Dozen which is a shimmery gunmetal (again, with great coverage!). After the two coats are dry - peel away! This part is definitely the most fun - and rewarding. If you peel back a piece of striping tape and it doesn't peel nicely, wait a few more minutes before trying the next piece!


Overall - the Sonia Kashuk polishes were smooth and had full coverage after only two coats. The real winner is Golden Ticket - which may be the best full coverage gold polish we've yet to get our hands on. Sonia Kashuk polishes are available at Target for $4.79 in the US - and hopefully will be available at any Target locations in Canada as they begin to open!

Disclaimer: These products were provided to us by the company/PR for our honest consideration and review.

1 comments:

We take time to read each and every comment! Thanks so much :)

Tulip Nail Art ft. PRITI NYC


So here we are, only a month left until Spring officially starts - and already I'm excited for winter to be over… if only all the Canadian snow would melt. Today we have a manicure for you which features a brand which is new to us, Priti NYC. This brand is non-toxic and 4 free, or free of 4 known carcinogens including  toluene, dibutyl phthalate (DBP), formaldehyde, and camphor. Many brands are marketing themselves as 3 free recently - for more on what this means see All Laquered Up's great resource on this topic!

Priti NYC was started in 2005 by founder Kim D'Amato with the goal of reducing harmful chemicals and supporting organic farmers - and we have to say that it is a success! For all the eco-friendly non-believers out there, these polishes will change your mind, no question about it. Crown of Thorns (a gorgeous baby blue) delivers in terms of colour payout and opacity. We cannot get enough of this colour and have been rocking it solo with an accent nail. For all the pastel lovers rejoicing at Spring's new collections - this colour is for you!

To help usher in the Springtime, we used a few (but really, 8) of Priti NYC's shades to create a full finger tulip mani, putting accent nail florals to shame! This mani was created using Crown of Thorns as a base. We started by using the darker pink and yellow (Nice Gal Peony and Lampshade Poppy, respectively) to draw a U shape with a thin brush wherever we wanted the flowers to be. We tried to make each nail different - that's part of the fun! Then we used the lighter pink and yellow (Ballerina Peony and Horned Poppy) to fill the U half full with the same nail art brush. While waiting for the tulips to dry before adding white, we used a clean nail art brush to draw stems in Baby Tears from the base of each tulip to the free edge of our nail. We added some leaves for fun, and then used the lighter green shade, Love Patt, on top, to give a more dimensional look to the leaves. To finish this mani, we used White Ballet Dahlia on the tips of both the tulips (using a clean nail art brush). Then we used our favourite Seche Vite topcoat, and allowed to dry. Check out the picture below, and let us know what you think!


Overall, the Priti NYC polishes were easy to apply and had a better smell than most other nail polishes - which we love! We definitely recommend checking out Priti NYC, you can find them on Facebook, Twitter, and Pinterest!

Disclaimer: These products were provided to us by the company/PR for our honest consideration and review.

2 comments:

We take time to read each and every comment! Thanks so much :)

Spring Can't-Miss List 2013

What is the Can't-Miss List? It's a list of our top polishes that we just can't wait to get our hands on!

1. Nails Inc. Feathers Collection

Nails Inc. Feathers in Cornwall
photo from Nails Inc.
This line of polishes (which comes in four colours, including Cornwall Feathers, pictured) has small multicoloured rubberized strips in it, giving it a textured 'feathered' look when applied to nails. Textured nails are becoming more and more mainstream, and we're loving where this collection is taking it! Checking out this collection in stores is a must!

This collection is already released on the Nails Inc. website, however it has not shown up at our local Sephora yet. For fabulous swatches, we suggest the Polishaholic!


2. OPI inspired by Oz The Great and Powerful

OPI Oz collection in What Wizardry is This?
photo from OPI

This collection, set to be released in March 2013, is inspired by the upcoming movie Oz The Great and Powerful starring James Franco and Michelle Williams. It is undeniably hard to say no to a polish designed with James Franco in mind.

The collection includes 3 glitter shades (Which is Witch? has holographic glitter - our favourite!), three neutral pink creme shades, and one new Liquid Sand shade, pictured to the left. The Liquid Sand shade, a rich brown, is the polish inspired by James Franco - who plays the Wizard of Oz. Not only are we dying to see the movie, we are dying to check out these polishes! For swatches of this collection, we recommend Ommorphia.


3. Essie Madison Ave-hue

Madison Ave-hue polish, from the Madison
 Ave-hue collection, photo from Essie


Why do we love Essie so much? The rich colours have proven their great colour payoff, and we can never have enough pastels (Mint Candy Apple is an all time favourite Essie polish).

The Madison Ave-hue collection features six creme polishes, which includes two purple shades, a blue, grey, red, and the pink (pictured). Some of the photos do look rather similar to other Essie polishes to us, as was noted by The Sunday Girl. We have high hopes for these polishes and look forward to seeing them in stores around March 1st - though we have yet to see an official release date.


4. Deborah Lippmann Staccato Collection
The full Deborah Lippmann Staccato Collection
Image from Nail Candy 101
This collection boasts three shades, all of which contain small black glitter. Named the 'Staccato Collection', the line includes a pink, white, and pale green creme base.

This line is reminiscent of the Illamasqua Speckled collection, but the brighter pastels have really caught our eye. Set to be released in April 2013, we cannot wait to check these out!


What do you think of these upcoming collections? Did we miss something big? Let us know!


0 comments:

We take time to read each and every comment! Thanks so much :)

NOTD: Gold and Black Stud Manicure


Today's Nail of the Day is a gold and black 'studded' manicure. The stud's are microbeads which we purchased from our local Micheal's and are Recollections brand. We adhered them when the topcoat was wet, using a damp paint brush to pick them up and (attempt) to neatly place them on the nail!

We used PRITI NYC's Horned Poppy, available here, underneath a Chanel Gold (limited edition - we're sorry!) similar to the Sonia Kashuk Golden Ticket for the normal nails, and used Essie Licorice, available here, for the black on the accent nail!

0 comments:

We take time to read each and every comment! Thanks so much :)

Geo Nails


We've been dying to try these nails since we first saw them all over instagram, but we couldn't find a colour match we were in love with enough to really go for it - until we decided on these. Essie's Bikini So Teeny, available here, and Nails Inc. Sumner Place, available here.

We started with Essie Bikini So Teeny on all nails (except the ring finger and thumb, which we inverted to Sumner Place), then used striping tape to make a perfect line up the middle of any fingers we wanted this design on. We then used a nail art brush to brush on an angled line starting from the middle of the nail in the centre, to about 3/4 to the cuticle on the edge. We then 'filled in' the bottom half with the opposite colour, and allowed the polish to dry before peeling off the striping tape. Finish with some topcoat, and you're done!


This mani was quick and easy, definitely a good first attempt at working with striping tape. More striping tape mani's on their way in the future...

2 comments:

We take time to read each and every comment! Thanks so much :)

Spring Striped Mani


Spring has sprung! Or is that just our nails? Regardless, we're getting in to the season by sporting some bright and pastel stripes on our fingertips. For this look we used a variety of brands and colours, but the fun of this mani is mixing and matching! Gather a bunch of your favourite polishes and go with the flow. We used striping tape, available here, to create the straight edges for our lines - but you could just as easily use a thin paint brush available at your local craft store.


We started with OPI's Alpine Snow for our base, a classic white with great coverage. We used Seche Vite top coat and let that dry for about 10 minutes, to ensure the striping tape didn't strip the white polish. Then we applied striping tape at different intervals to achieve the bands of different thickness. We used a few of our favourite colours, examples above, to paint within the boundaries of the striping tape. Alternating the order of your colours on each nail makes this mani even more playful, we tried to keep each nail different! Then, after a few minutes drying time, we carefully peeled off the striping tape and finished with a second coat of top coat! Voila, stripes for spring!

2 comments:

We take time to read each and every comment! Thanks so much :)

Red Rose Nails ft. Butter London


If you didn't know, Valentine's day is coming up. Shocked? Us too. We've been the culprit of the done to death heart nail art many times, but this time we decided to go for a fresh take on Valentine's day nails - red roses! Thanks to Butter London's 25% off Reds Sale, we picked up some classic reds including Blowing Raspberries, Knees Up, Pillar Box Red, and the classic Union Jack Black.

Close up of the middle and ring finger
We have been feeling like a full hand nail art was in store - go big or go home, right? - and so we painted each nail to look like a bouquet of red roses. We started (post base-coat) with Knees Up, which is a gorgeous metallic red which catches the light behind the roses. We then used a nail art brush to make swirl patterns (making up a circle) of Blowing Raspberries and Pillar Box Red covering most of the nail in circles, or 'roses-in-progress', to create depth. We then used a steady hand and a super-thin nail art brush to paint the shadows of the roses in Union Jack Black. Finish with topcoat, and voila - a wilt-proof red rose bouquet!

Full Red Rose Nails
If you're feeling like the full hand is too much for you, we also love this look on the accent nail, with a full hand of Blowing Raspberries (which may just be our new go-to berry shade) to contrast the metallic. What mani will you be rocking on Valentine's day?

0 comments:

We take time to read each and every comment! Thanks so much :)

NOTD: Ombre Love Manicure


0 comments:

We take time to read each and every comment! Thanks so much :)